


A quick physics lesson, my Top 5 Winter veg to BBQ, and Fire School cancellations and summer schedule incoming ...
Good morning TeamFire!

Physics of Fire
So after bad and good charcoal, little light science is the next most important thing with fire cooking - learning how fire and heat works is essential. Once you learn, and practice, how to light, control, adapt and work with the fire it simply becomes a form of cooking like any other. Knowing a little basic physics is the key to understanding why and where to put food on the grill. Don’t switch off – even if science isn’t your thing, embrace your inner nerd just a moment.
Remember that heat is a type of energy and that nature always wants to create an energy equilibrium. So heat energy transfers into cold things, warming them up, trying to equalise the temperature gradient between hot and cold. At the beginning of the cooking process, heat transfers into the outside of your food, exciting the molecules at the surface. They jiggle and bounce around a little, generating more heat that then transfers into the next layer of colder molecules, which become hot and excited and repeat the process. So heat gradually transfers from the outside to the inside. The thinner your meat the more quickly this happens, which is why a big pork joint takes far longer to cook than a single chop.
With fire cooking we are utilising three kinds of heat:
• Infrared radiation heat This is the heat produced from the lit fuel itself - I think of it as the ‘Mother Heat’, this is infrared radiation glowing off the hot surface of your charcoal or wood fire. The closer you are to the source, the hotter the heat. It’s the same type of heat energy as the sun gives us. When we turn our face up towards to the sun on a spring day we are soaking up a little infrared heat that warms our skin in a rather lovely way.
• Conduction heat The infrared radiation from lit fuel quickly transfers into the cooking surfaces – the grill bars or the cast-iron pan you have placed over the fire. This heat energy is called conduction or contact heat, and is the same type of heat as when we snuggle up to a loved one and feel the heat of their body pressing against our own. Some of their warmth will conduct into your body and some of your warmth will conduct into theirs. It’s a sharing kind of heat; you put food on a hot grill, the grill gives up its heat to your food and cooks it.
• Convection heat The third type of heat energy we are interested in is convection currents – or the circulation of hot air, just like the heat we get from a hairdryer. With cooking, convection heat only really comes into play in a meaningful way when you contain it, so by shutting the lid on your barbecue or by putting a lid on a bubbling pan. For this reason, having the ability to shut a lid when cooking is really rather useful as you can hugely increase the efficiency of the heat your fuel produces, trapping it in, creating a more steamy, moisture- filled cooking environment. You wouldn’t dream of trying to bake a cake in your oven while leaving the door open, and it’s the same with most sorts of barbecue cooking. A barbecue with a lid also allows you control of the all-important oxygen element in the fire triangle. There are a few rare times when a lid doesn’t help you – searing a steak is the key example.
Moving food between and in relation to these different heat sources is what gives us fire control. In one brief sentence, the smaller and thinner something is, the more direct infrared heat you can use to cook it, and the bigger and tougher the food, the less infrared heat you should use, relying on convection heat as your principle cooking method, so cooking ‘indirect’ from the source heat. Infrared is what gives us the dreaded burnt outside/raw in the middle scenario.
Talking of STEAK…
If you are a paid subscriber you may have noticed I announced a free online steak masterclass. One of the key things I want to offer paying subscribers is access to occasional online sessions on specific subjects - kind of like mini Fire School classes. A way to get to my knowledge without travelling to Bristol or having to pay for a day-long session. And I think £4 a month is probably quite a bargain for a direct slice of me and my brain-full of fire cooking geekiness.
This first session, taking place mid April, will be all about the beefs with my pal Olly from Meatmatters. Perfect steak is the ultimate goal of the carnivorous barbecuer, (although I hope at least some of you are excited to try some of the veg ideas below), and it will probably come as no surprise to know that I believe science plays a big role in success. Olly and I will look at, and cook, different cuts of steaks and talk about the various ways you can cook them to bring out the best in them, getting both a cracking meal and fully honouring the life of that animal. If you would like to pour yourself a glass and join us in April, head to the upgrade page here:
Top 5 winter veg to BBQ
It seems that some of you need a little help choosing what to cook! One of the things a few of you have asked for is some pointers to my fave recipes in my books which is perhaps like asking me to chose my favourite child (answer being, it depends which day you ask me).
So, as we are entering the Hungry Gap, the spring months where the UK winter veg is falling away and the warmer soil veg have yet to arrive, I thought I’d point out my fave seasonal veg recipes from CHARRED. I know lots of you have this book of mine (thank you!), but for those that don’t its a bit of a bible to grilling vegetables that started life when I had gluts of everything from my allotment and started merrily experimenting away. I guess in all honesty I kind of wrote it for the Central Casting Barbecue Nut out there (you perhaps know the type - male, sturdy of stature, big beard, armfuls of tattoos?) to try and bust the myth that good barbecue has to be about giant slabs of meat. I’m am proudly omnivorous and in many ways eating veg is excites me more than big lumps of meat.
So, my top 5 winter veg to barbecue?
Carrots
It was actually a carrot recipe that started CHARRED as a germ of a book idea - Barbecued carrot, ricotta and toasted pecans, p146, still a firm favourite with me. Ticking lots of boxes - sweet, crunchy, fresh, herby, creamy… I just love it. You might too, if you have the book, just make it.
Jerusalem artichokes
Such interesting flavoured little tubers (although apparently they make you fart. No comment), brilliant for roasting and smoking over an indirect heat. If you have some space on an allotment or in a garden these are so easy to grow, just stuff them in like you would a spud and up they flourish. Very pretty yellow flowers too, they are a type of sunflower, and the bees love them. Try the Smoked Jerusalem artichokes, charred rosemary mayonnaise, on p86
Swede
Another really cheap and underrated veg, before I tried barbecuing them the only thing I ever did was mash ‘em with vast quantities of butter but they contain a lot of natural sugars that really concentrate with gentle indirect cooking (no infrared heat here please!!). They do take a bit of time, like all the dense roots and tubers but in this recipe you pretty much let them get on with it, hands off barbecue at its best - Slow-cooked swede wedges, Jack Daniels and peppercorn cream sauce, p90
Rainbow chard
The easiest thing to grow, poke the seeds in and just let it happen, I think of Rainbow chard as a more substantial, better, cousin to spinach. The stems are on the chunky side, and come in beautiful array of colours hence the name, so I tend to separate them and grill for a little bit first before grilling the leaves. Try the Rainbow chard, Cheddar and mango chutney toastie, p68
Parsnips
One of those veg thats cheap and cheerful to buy but that general only gets roasted for Sunday lunch, or maybe blitzed as a soup at a push. Who knew smoking a parsnip would be so successful? They soak up the smoke a treat, enhancing the natural sweetness and in this recipe - see below! - the fennel butter in so insanely good I still occasionally dream about it. This is a recipe I am sharing… please try it, report back.
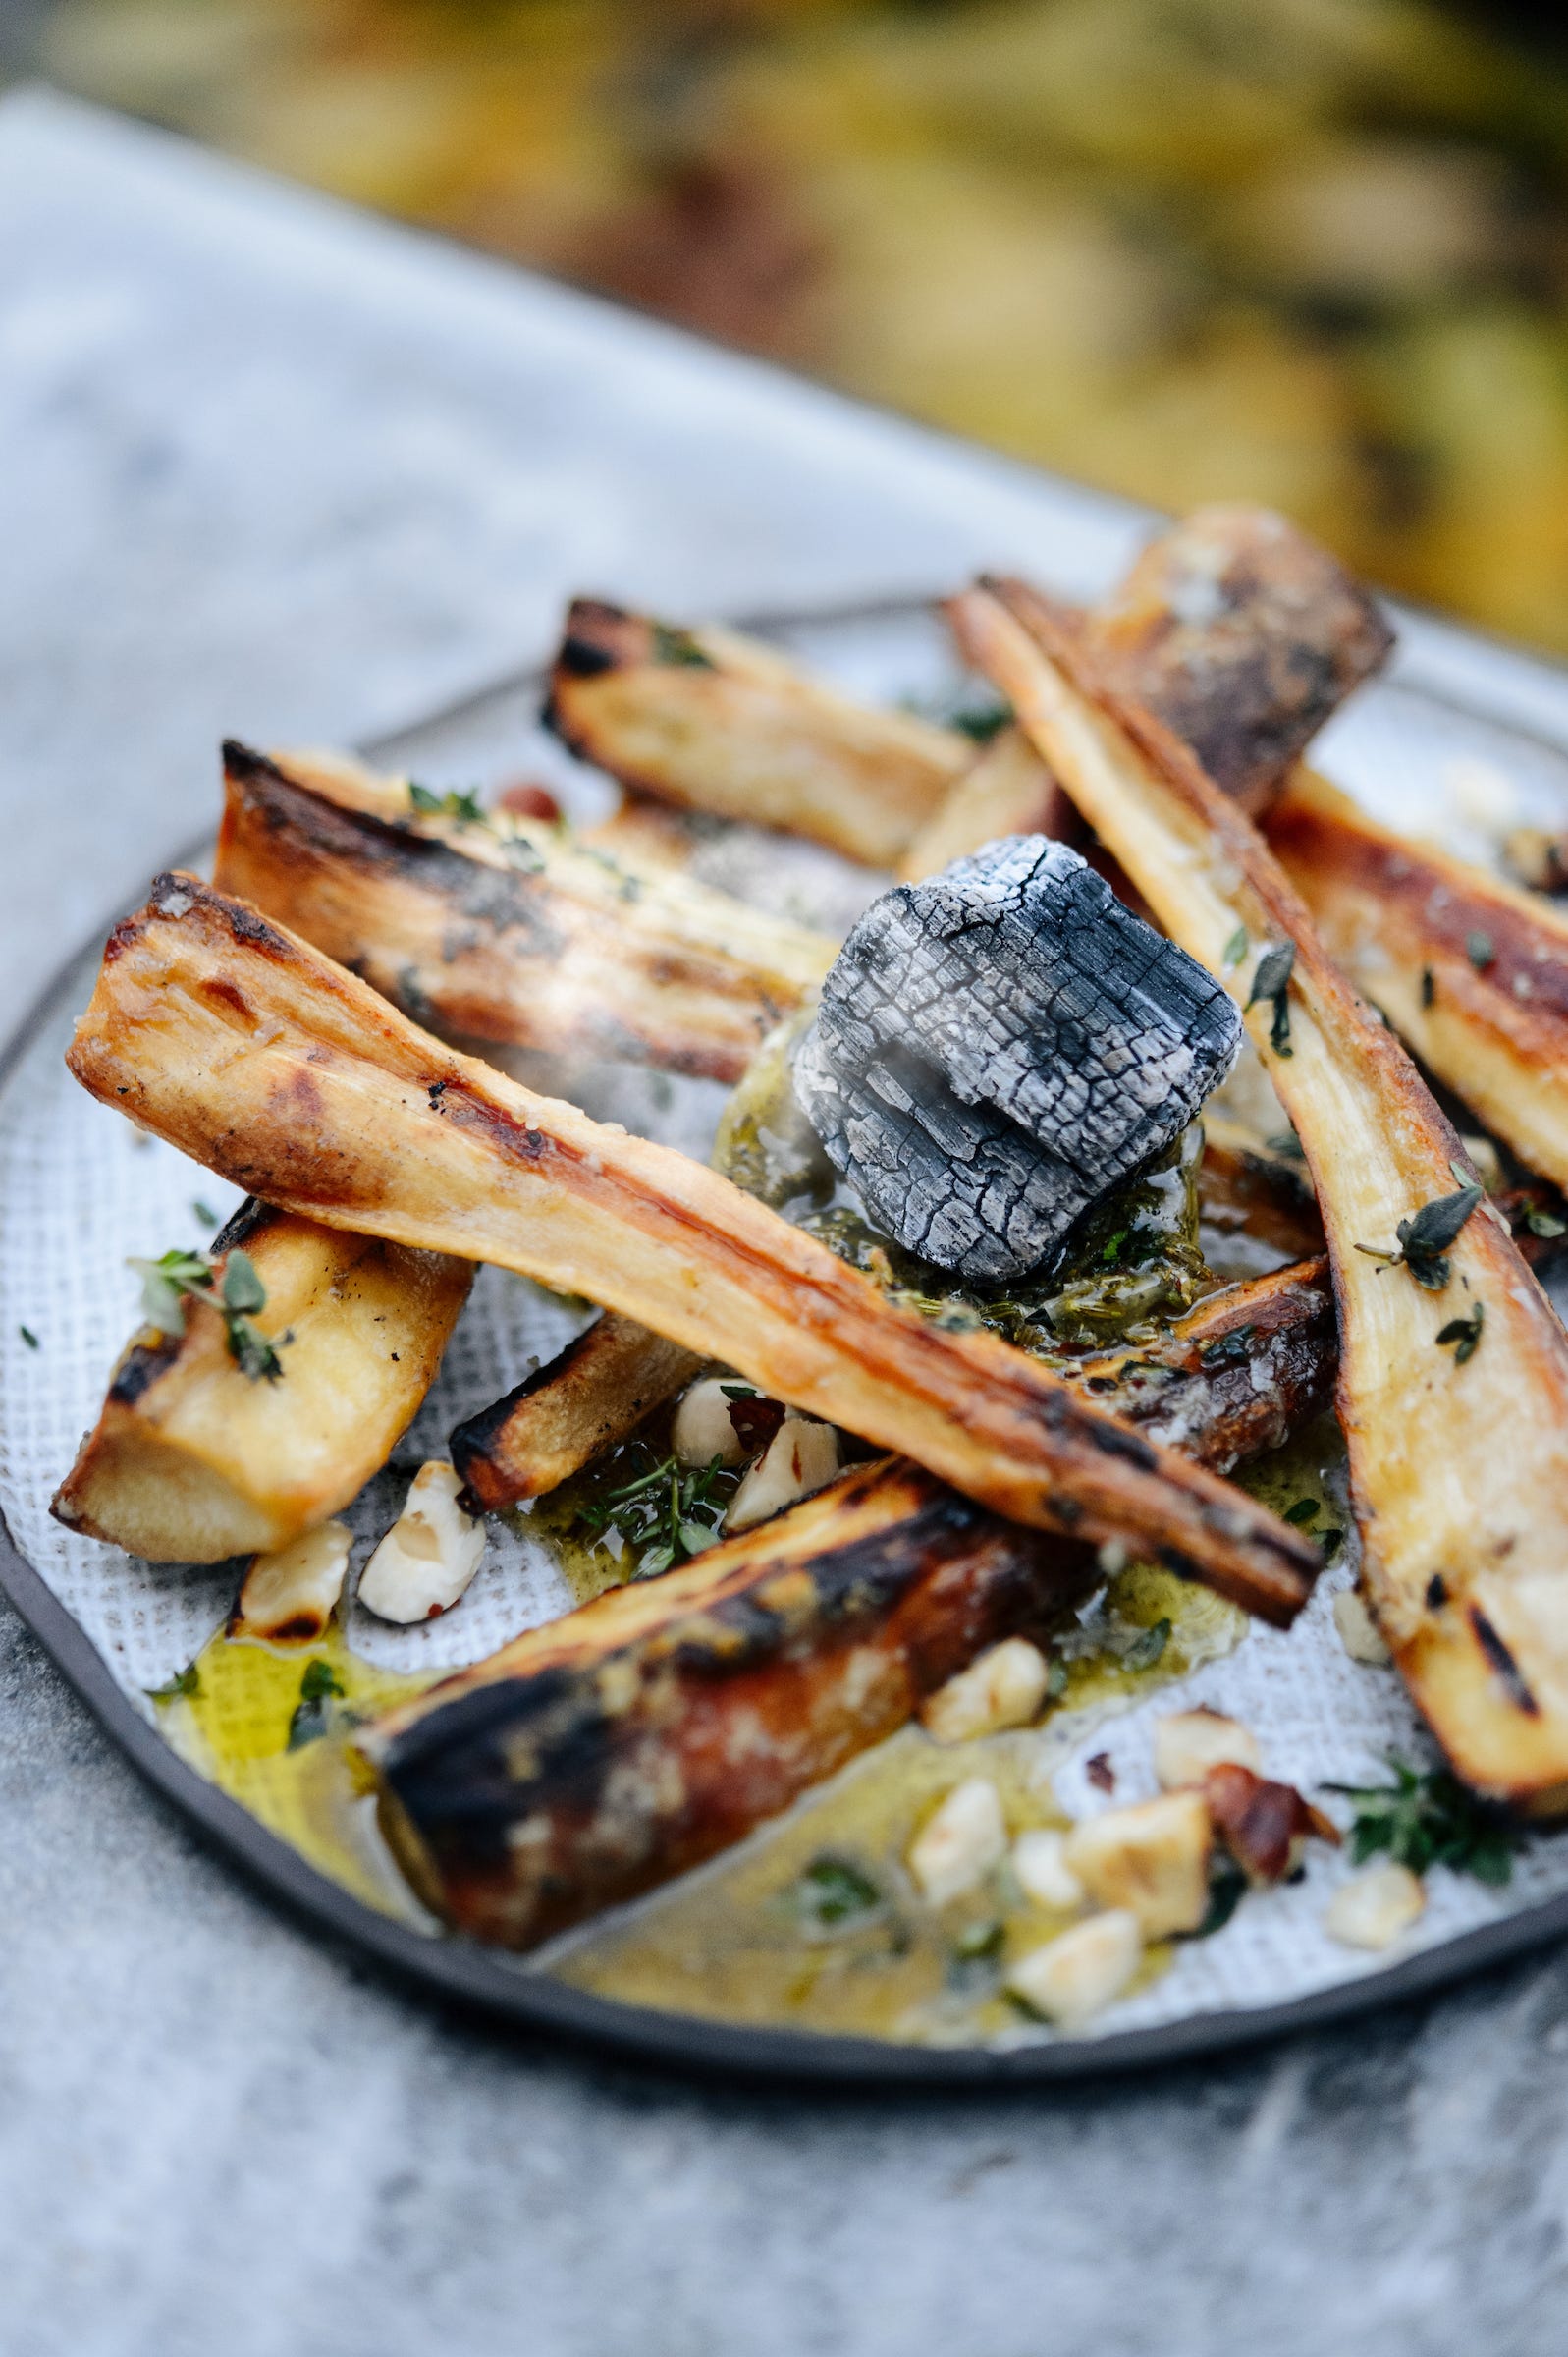
Smoked Parmesan parsnips, fennel butter, hazelnuts
If you have some glowing coals left after cooking, it’s fun to use tongs to place one on top of the butter slices to melt and sizzle as you bring to the dish to the table.
Serves 4
1kg fat parsnips, peeled and cut into quarters lengthways, 1 tbsp olive oil
50g Parmesan, freshly grated, 50g hazelnuts, toasted and roughly chopped
a few sprigs of thyme, leaves picked, salt and freshly ground black pepper
for the fennel butter: 1 heaped tbsp fennel seeds, 75g butter, slightly softened, 1 tbsp runny honey
Fire up the barbecue ready for indirect grilling. Once it’s up to temperature, throw on some smoking wood chunks and allow them to catch and smoulder.
Tip the parsnips into a fireproof roasting tin, drizzle with the olive oil, season with a little salt and pepper and toss to mix. Rest the tin on the barbecue, well away from the fire. Shut the lid to allow maximum bathing in the smoke. Cook for 45–50 minutes, rotating the tin once or twice and tossing the parsnips about to ensure they are cooking evenly. Add more wood chunks as necessary to keep a fairly constant smoke going.
Meanwhile, make the fennel butter. Tip the fennel seeds into a small frying pan and set over a medium-high heat on the hob to toast for a couple of minutes. Transfer to a pestle and mortar and crush to a coarse powder. Add the softened butter and honey and mix together, along with a little salt and pepper. Scoop into a bowl and set aside.
Once the parsnips are tender and lightly coloured, remove the tin from the barbecue, shutting the lid to keep the heat in. Sprinkle over the Parmesan and toss to coat evenly. Remove the parsnips one by one and rest them directly on the grill bars over the fire.
Cook for about 7–10 minutes, turning regularly, until they are deeply golden and crisp.
Put the parsnips on a serving plate. Scatter with the hazelnuts and thyme leaves. Top the parsnips with dollops of fennel butter, adding a few glowing coals to melt the butter if you like. Serve immediately.
Fire School Cancellations & Summer dates
Now classes have began again there will inevitably be occasional cancellations. Those signed up to this newsletter will automatically get an email to advise of any spaces that become available. I hope this won’t be irritating, but I can’t think of a better place to shout about last minute availability. But I will make sure that cancellations are in an entirely separate email to the newsletter, and the subject line will clearly state BRISTOL FIRE SCHOOL CANCELLATIONS, so if you are uninterested you can just delete before opening.
And, I will be releasing SUMMER 2023 places here in a couple of weeks, around Easter (can’t believe its Easter already). I anticipate them filling quick, so get in fast if you want to come.
And that’s it for now. Thanks as ever for your support. Don’t forget to keep your questions coming by posting a comment below or dropping me an email or DM on instagram.
Big love,
GT x
HI Gen, recipe sounds great and I hope to try it within the next few weeks. Just curious to what chunks of wood you use to smoke veggies?
Hi Gen.
I’ve been dipping in to your Charred recipe book, but so far it’s been mostly to make some interesting veg dishes alongside a meat or fish one. I need to jump in to doing some all-veg meals!
I find it quite daunting to create multiple bbq’d dishes on the same bbq and have them all hot and ready to serve at the same time. If I’m doing a quick-cooking veg like broccoli, courgette or asparagus, this feels more manageable as I do it on direct heat while the meat is resting; but if I want to cook root veg or spuds along side a roast, I often wind up doing it in the kitchen oven or just underneath whatever meat I’m roasting, so it always turns out the same - not like this epic sounding parsnip dish you’ve shared!
Sometimes I crack out my little Weber Go-Anywhere alongside my kettle and have 2 fires going, but I feel like I could up-skill in just using the kettle more efficiently.
It’s ok if I’m following a set recipe in a fire cook book which includes a few different things and is more of a recipe to create a whole meal rather than just one dish, as the recipe talks you through how to do each step, but I get a but stuck when I’m doing something like a side of salmon or a steak and I just want to jazz it up with some interesting veg sides. I often wind up using the hob indoors as well as my Weber kettle to make sure it’s all done at the same time - it feels a bit daft.
Any suggestions on how I can get more proficient at making the most of my Weber kettle to cook up multiple dishes as part of a bigger meal? (And yes, I know I need to stop looking at veg as the side-show!) :-)
Keeping my eyes peeled for your summer Fire School schedule - thanks for all you do.
Anna